Parametric simulation
(→SctParSim) |
(→SctParSim (Python)) |
||
| Line 18: | Line 18: | ||
= SctParSim (Python) = | = SctParSim (Python) = | ||
| + | |||
| + | This version of the parametric simulation had written in the Python language. The main difference is that this version has the ability to draw events. How to run and parameter description is [[SctParSim (python)|here]] | ||
== How to run == | == How to run == | ||
Revision as of 21:45, 23 November 2021
Contents |
Talks
- Software meeting 2018-06-29, Friday, File:Sctau papas v2 20180629.pdf
- Workshop on future Super c-tau factories 2021-11-16 Parametric simulation of the SCT detector
SctParSim
A parametric simulation is a tool to receive a detector response without detailed description of interaction of particles with matter. The simulation is the part of the Aurora project, which is a software suit for SCTF. More details are here
Implemented detector subsystems:
- drift chamber
- FARICH PID system
- calorimeter
- muon system
The parametric simulation yields the detector response in the SCT EDM format thus allowing to analyze its result in the same manner as the result of the full simulation.
How-to use the parametric simulation is demonstrated here
SctParSim (Python)
This version of the parametric simulation had written in the Python language. The main difference is that this version has the ability to draw events. How to run and parameter description is here
How to run
Login to stark or proxima machine.
ssh stark -X
setupSCTAU; asetup SCTauSim,master,latest
mkdir workarea
cd workarea
mkdir run
cd run
cp /home/razuvaev/public/misc/pi_ms_f1_mppc2_px3_d200_mla4_graph2d.root .
cp /home/razuvaev/public/misc/gun1.cfg .
cp /home/razuvaev/public/misc/g4beamline_pi_plus_100k_parse.root .
cp /home/razuvaev/public/misc/g4beamline_mu_plus_100k_parse.root .
cp /home/whitem/public/misc/pi_p.root .
cp /home/whitem/public/misc/pi_m.root .
cp /home/whitem/public/misc/mu_p.root .
cp /home/whitem/public/misc/mu_m.root .
runparsim.py
Options
| Option | Run example | Description |
|---|---|---|
-b, --batch
|
runparsim.py -b
|
Turn on the batch mode. Suppress EventDisplay execution. |
-c, --change
|
runparsim.py -c my_cfg_file.dat
|
Change some parameters of the detector. |
-n, --neve
|
runparsim.py -n 31415
|
The number of events to process. |
-g, --gun
|
runparsim.py -g
|
Turn on the particle gun mode. |
-ig, --input-gun
|
runparsim.py -g -ig my_gun.dat
|
Input particle gun configuration file. |
-i, --input
|
runparsim.py -i gen_dkpipi0.root
|
Specify the input file. |
-o, --output
|
runparsim.py -o parsim_dkpipi0.root
|
Specify the output file. |
--profile
|
runparsim.py --profile
|
Turn on the cProfile to analyse the performance. |
Event display
The event display has two projections: x-y and y-z. All detector subsystems are presented. Some of them overlay, especially PIDs, it is not important for parametric simulation, but let's study several options at once. All particles from AllGenParticles branch are presented at the plot by lines of different styles, colours and thicknesses. Somehow the line thickness corresponds to the particle mass, the wide line --- the more massive particle. Warm colours are devoted to positive charged particles and cold to negative ones. Also, particle lines are labeled.
The event display is switched on by default. To switch it off run simulation with -b option.
Detector configuration
The detector parameters can be changed via a configuration file my_cfg_file.dat placed in the main simulation folder. The file has a simple structure --- one parameter and its value(s) per line. A parameter's name and value should be separated by spaces. Arrays should be written in [] brackets. The values in arrays should be separated by commas. Empty lines and lines contained incorrectly parameter names are ignored.
In the example below the parameter at the first line and the second line is one number, while the parameter at the third line is an array.
trck.minPt 0.05
trck.corrMtx.pij -0.08
calo.resPar [0.167,0.0,0.011]
The parameters can be given in any order.
All detector parameters can be viewed in the configuration files:
| Subsystem | Congiguration file | Name to change parameters |
|---|---|---|
| ASHIPH | ashiphpars_std01.json
|
ashiph1030
|
| Calorimeter | calopars_std01.json
|
calo
|
| FARICH | farichpars_std01.json
|
farich
|
| FDIRC | fdircpars_std01.json
|
fdirc
|
| Muon system | muonpars_std01.json
|
muon
|
| ToF | tofpars_std01.json
|
tof
|
| ToP | toppars_std01.json
|
top
|
| Tracker | trkpars_std01.json
|
tracker
|
The detector subsystems sizes are stored in detlayout_std01.json. They can be changed in the same way.
Particle gun
Examples
Pictures
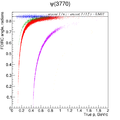
FDIRC angle vs true momentum.

PAPAS (Old)
About papas, heppy et cetra
Particle propagation is done by geometry calculation. To valid the calculation several different cases were plotted.

Configure detector parameters
The detector parameters can be changed via a configuration file CTauPapas.cfg placed in the main papas simulation folder. The file has a simple structure --- one parameter and its value(s) per line. A parameter's name and value(s) should be separated by spaces. Empty lines and lines beginning with # are ignored.
In the example below the parameter at the first line is one number, while the parameter at the second line is an array.
ecal_emin_barrel 0.05
ecal_eres 1.34e-2 0.066e-2 0 0.82e-2
The parameters can be given in any order.
Configure detector parameters
The file ctau_input_sim.txt contains two lines. The first line is the path to a primary simulation file (see MC Data Sets page). The second line is an integer number of events to be processed.
How to run papas
Copy a directory with papas on stark the machine and go to this directory.
cd
cp -rf ~razuvaev/myheppy .
cd myheppy
There are a directory output for output files, detector configuration file CTauPapas.cfg, file ctau_input_sim.txt with a path to the file with primary generator events, and the folder heppy with heppy code itself. Let's go into it and tune environment.
cd heppy
source init.sh
Now it is time to run papas.
You may be asked a question because the output directory is not empty.
So just input y or clean the folder.
cd test
./heppy_loop.py ../../output/ ctau_cfg1.py
If it don't want to run try source ~razuvaev/.bashrc and source ../init.sh because it can be caused by the problem with environment variables.
When papas simulation has been done one need to present papas output to a suitable form and also add initial generator information.
cd ../../
./txt2tree.py
The output root tree is available in the file myheppy/output/txt2tree.root.
Output tree
The output tree contains branches which can be divided in several groups:
- reconstructed particle parameters;
- generated particle parameters;
- generated vertices;
- connection between reconstructed particles, generated particles and generated vertices.
The table below presents branches and description of their content.
| Name | Type | Length | Description |
|---|---|---|---|
| Reconstructed particles | |||
| n | int | 1 | The number of reconstructed particles. |
| px | float [] | n | The reconstructed particle momentum: x coordinate. |
| py | float [] | n | The reconstructed particle momentum: y coordinate. |
| pz | float [] | n | The reconstructed particle momentum: z coordinate. |
| Generated particles | |||
| n0 | int | 1 | The number of generated particles. |
| px0 | float [] | n0 | The generated particle momentum: x coordinate. |
| py0 | float [] | n0 | The generated particle momentum: y coordinate. |
| pz0 | float [] | n0 | The generated particle momentum: z coordinate. |
| Generated vertices | |||
| nv0 | int | 1 | The number of generated vertices. |
| vx0 | float [] | nv0 | The generated vertex: x coordinate. |
| vy0 | float [] | nv0 | The generated vertex: y coordinate. |
| vz0 | float [] | nv0 | The generated vertex: z coordinate. |
| Links | |||
| recgen | int [] | n | Transform a reconstructed particle index to the generated particle index. |
| genver | int [] | n0 | Transform a generated particle index to the generated vertex index. |
Analysis example
Here a short analysis example of
 is presented.
The things are performed with PyROOT.
is presented.
The things are performed with PyROOT.
The data a taken from the available exclusive sample.
The code can be taken from github [1] or find at the stark cluster: /home/razuvaev/myheppy/search_dkspipi.py.
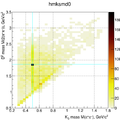
 mass vs
  mass.
mass.
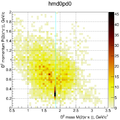 mass vs its momentum.

